Disaster recovery for planned failover
The primary use-case of Disaster Recovery is to ensure business continuity in the event of unplanned outage, but it can be used in conjunction with a planned failover to migrate your GitLab instance between regions without extended downtime.
As replication between Geo nodes is asynchronous, a planned failover requires a maintenance window in which updates to the primary node are blocked. The length of this window is determined by your replication capacity - once the secondary is completely in sync with the primary, the failover can occur without data loss.
This document assumes you already have a fully configured, working Geo setup. Please read it and the Disaster Recovery failover documentation in full before proceeding. Planned failover is a major operation, and if performed incorrectly, there is a high risk of data loss. Consider rehearsing the procedure until you are comfortable with the necessary steps and have a high degree of confidence in being able to perfom them accurately.
Not all data is automatically replicated
If you are using any GitLab features that Geo doesn't support, you must make separate provisions to ensure that the secondary node has an up-to-date copy of any data associated with that feature. This may extend the required scheduled maintenance period significantly.
A common strategy for keeping this period as short as possible for data stored
in files is to use rsync to transfer the data. An initial rsync can be
performed ahead of the maintenance window; subsequent rsyncs (including a
final transfer inside the maintenance window) will then transfer only the
changes between primary and secondary.
Repository-centric strategies for using rsync effectively can be found in the
moving repositories documentation; these strategies can
be adapted for use with any other file-based data, such as GitLab Pages (to
be found in /var/opt/gitlab/gitlab-rails/shared/pages if using Omnibus).
Pre-flight checks
Follow these steps before scheduling a planned failover to ensure the process will go smoothly.
Object storage
Some classes of non-repository data can use object storage in preference to file storage. Geo does not replicate data in object storage, leaving that task up to the object store itself. For a planned failover, this means you can decouple the replication of this data from the failover of the GitLab service.
If you're already using object storage, simply verify that your secondary has access to the same data as the primary - they must either they share the same object storage configuration, or the secondary should be configured to access a geographically-replicated copy provided by the object store itself.
If you have a large GitLab installation or cannot tolerate downtime, consider migrating to Object Storage before scheduling a planned failover. Doing so reduces both the length of the maintenance window, and the risk of data loss as a result of a poorly executed planned failover.
Review the configuration of the secondary
Database settings are automatically replicated to the secondary, but the
/etc/gitlab/gitlab.rb file must be set up manually, and differs between
nodes. If features such as Mattermost, OAuth or LDAP integration are enabled
on the primary but not the secondary, they will be lost during failover.
Review the /etc/gitlab/gitlab.rb file for both nodes and ensure the secondary
supports everything the primary does before scheduling a planned failover.
Run system checks
Run the following on both primary and secondary nodes:
gitlab-rake gitlab:check
gitlab-rake gitlab:geo:check
If any failures are reported on either node, they should be resolved before scheduling a planned failover.
Check that secrets match between nodes
The SSH host keys and /etc/gitlab/gitlab-secrets.json files should be
identical on all nodes. Check this by running the following on all nodes and
comparing the output:
sudo sha256sum /etc/ssh/ssh_host* /etc/gitlab/gitlab-secrets.jsonIf any files differ, replace the content on the secondary with the content on the primary.
Ensure Geo replication is up-to-date
The maintenance window won't end until Geo replication and verification is completely finished. To keep the window as short as possible, you should ensure these processes are close to 100% as possible during active use.
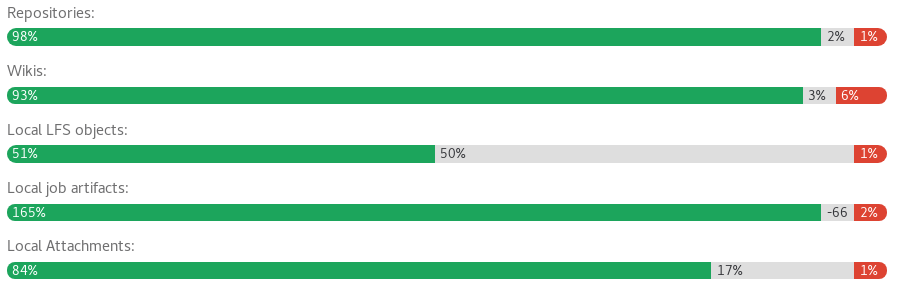
Visit the Admin Area ➔ Geo nodes dashboard on the secondary node to review status. Replicated objects (shown in green) should be close to 100%, and there should be no failures (shown in red). If a large proportion of objects aren't yet replicated (shown in grey), consider giving the node more time to complete
If any objects are failing to replicate, this should be investigated before scheduling the maintenance window. Following a planned failover, anything that failed to replicate will be lost.
You can use the Geo status API to review failed objects and the reasons for failure.
A common cause of replication failures is the data being missing on the primary - you can resolve these failures by restoring the data from backup, or removing references to the missing data.
Verify the integrity of replicated data
This content was moved to another location.
Notify users of scheduled maintenance
On the primary, navigate to Admin Area ➔ Messages, add a broadcast message. You can check under Admin Area ➔ Geo Nodes to estimate how long it will take to finish syncing. An example message would be:
A scheduled maintenance will take place at XX:XX UTC. We expect it to take less than 1 hour.
Prevent updates to the primary
Until a read-only mode is implemented, updates must be prevented from happening manually. Note that your secondary still needs read-only access to the primary for the duration of the maintenance window.
-
At the scheduled time, using your cloud provider or your node's firewall, block all HTTP, HTTPS and SSH traffic to/from the primary, except for your IP and the secondary's IP.
For instance, if your secondary originates all its traffic from
5.6.7.8and your IP is100.0.0.1, you might run the following commands on the server(s) making up your primary node:sudo iptables -A INPUT -p tcp -s 5.6.7.8 --destination-port 22 -j ACCEPT sudo iptables -A INPUT -p tcp -s 100.0.0.1 --destination-port 22 -j ACCEPT sudo iptables -A INPUT --destination-port 22 -j REJECT sudo iptables -A INPUT -p tcp -s 5.6.7.8 --destination-port 80 -j ACCEPT sudo iptables -A INPUT -p tcp -s 100.0.0.1 --destination-port 80 -j ACCEPT sudo iptables -A INPUT --tcp-dport 80 -j REJECT sudo iptables -A INPUT -p tcp -s 5.6.7.8 --destination-port 443 -j ACCEPT sudo iptables -A INPUT -p tcp -s 100.0.0.1 --destination-port 443 -j ACCEPT sudo iptables -A INPUT --tcp-dport 443 -j REJECTFrom this point, users will be unable to view their data or make changes on the primary node. They will also be unable to log in to the secondary node, but existing sessions will work for the remainder of the maintenance period, and public data will be accessible throughout.
Verify the primary is blocked to HTTP traffic by visiting it in browser via another IP. The server should refuse connection.
Verify the primary is blocked to Git over SSH traffic by attempting to pull an existing Git repository with an SSH remote URL. The server should refuse connection.
Disable non-Geo periodic background jobs on the primary node by navigating to Admin Area ➔ Monitoring ➔ Background Jobs ➔ Cron , pressing
Disable All, and then pressingEnablefor thegeo_sidekiq_cron_config_workercron job. This job will re-enable several other cron jobs that are essential for planned failover to complete successfully.
Finish replicating and verifying all data
- If you are manually replicating any data not managed by Geo, trigger the final replication process now.
- On the primary, navigate to Admin Area ➔ Monitoring ➔ Background Jobs ➔ Queues
and wait for all queues except those with
geoin the name to drop to 0. These queues contain work that has been submitted by your users; failing over before it is completed will cause the work to be lost! -
On the primary, navigate to Admin Area ➔ Geo Nodes and wait for the following conditions to be true of the secondary you are failing over to:
- All replication meters to each 100% replicated, 0% failures
- All verification meters reach 100% verified, 0% failures
- Database replication lag is 0ms
- The Geo log cursor is up to date (0 events behind)
On the secondary, navigate to Admin Area > Monitoring ➔ Background Jobs ➔ Queues and wait for all the
geoqueues to drop to 0 queued and 0 running jobs.On the secondary, use these instructions to verify the integrity of CI artifacts, LFS objects and uploads in file storage.
At this point, your secondary will contain an up-to-date copy of everything the primary has, meaning nothing will be lost when you fail over.
Promote the secondary
Finally, follow the Disaster Recovery docs to promote the secondary to a primary. This process will cause a brief outage on the secondary, and users may need to log in again.
Once it is completed, the maintenance window is over! Your new primary will now begin to diverge from the old one. If problems do arise at this point, failing back to the old primary is possible, but likely to result in the loss of any data uploaded to the new primary in the meantime.
Don't forget to remove the broadcast message after failover is complete.